How to Clean a Dryer Vent: A Step-by-Step Guide (and Why It Matters)
Lint buildup is a leading cause of home dryer fires. Here's how to clean your dryer vent duct yourself, how often to do it, and the signs your vent is clogged.
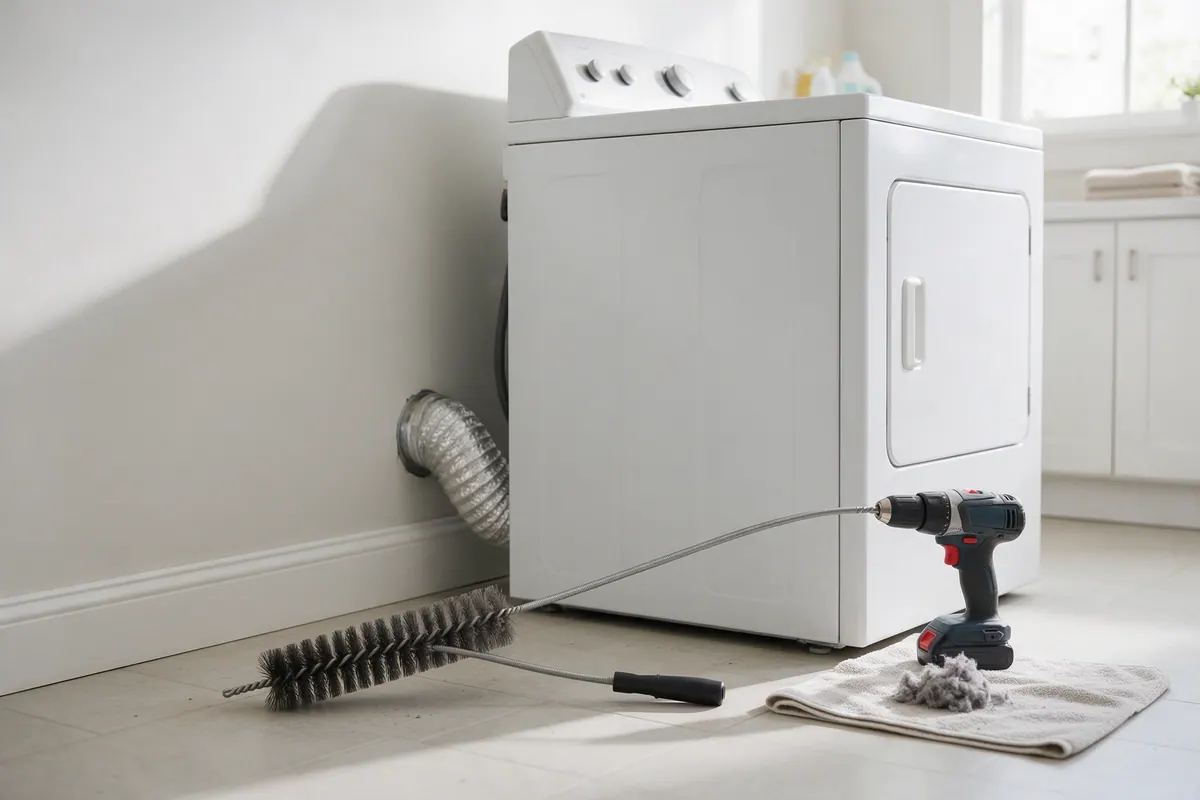
Cleaning the lint screen is not the same as cleaning the dryer vent. Lint that gets past the screen builds up inside the duct that runs from the back of the dryer to the outside of your house. Over time that buildup slows drying, wastes energy, and creates a real fire risk.
Why dryer vent cleaning matters
According to the National Fire Protection Association (NFPA), U.S. fire departments responded to an estimated average of 13,820 home structure fires per year involving dryers from 2014 to 2018, and about one-third (32%) were caused by a failure to clean. NFPA’s safety guidance is to clean the lint filter before or after every load and to clean lint out of the vent pipe once a year, or more often if drying takes longer than normal.
Signs your dryer vent is clogged
- Towels or jeans need more than one cycle to dry
- The top of the dryer or the laundry room gets unusually hot
- A burning smell when the dryer runs
- Lint collecting around the outside vent hood, or a flap that barely opens
- The dryer shuts off mid-cycle (an overheating safety device may be tripping)
What you’ll need
- A rotary dryer vent cleaning kit (flexible rods and a brush that spin with a drill)
- A cordless drill
- A shop vacuum
- A screwdriver or nut driver for the duct clamp
- Optional: a new metal transition duct and UL 181 foil tape
Step by step
1. Disconnect power (and gas)
Unplug the dryer. If it is a gas dryer, turn off the gas valve behind it and move the dryer gently so you do not kink or strain the gas connector. If you smell gas at any point, stop, leave the house, and call your gas utility.
2. Pull the dryer out and detach the duct
Slide the dryer forward and loosen the clamp at the dryer’s exhaust outlet. Inspect the short transition duct between the dryer and the wall. If it is white vinyl or thin foil accordion duct, or is crushed or torn, replace it. NFPA recommends rigid or flexible metal venting.
3. Clean the lint screen housing
Pull out the lint screen and vacuum the slot it slides into. A lot of lint gets past a screen that is not seated well.
4. Brush out the duct
Attach the brush to one rod, feed it into the wall duct, and spin it clockwise with the drill on a low speed, which keeps screw-together rods from loosening. Add rods as you go and work in and out to break up lint. Pull the brush back out, vacuum the debris, and repeat until little lint comes out. If your duct is longer than your kit reaches, clean from the outside end too.
5. Clean the exterior hood
Go outside and remove lint, debris, and any bird or rodent nests from the vent hood. The flap or louvers should open freely when the dryer runs and close when it stops. Do not install screen mesh over a dryer exhaust; it traps lint.
6. Reconnect and test
Reconnect the transition duct to the dryer and the wall, keeping it as short and straight as possible without crushing it when you slide the dryer back. Seal metal joints with foil tape, not screws, which protrude into the duct and catch lint. Restore power (and gas), run the dryer on an air-only setting, and confirm you feel strong airflow at the exterior hood.
Make it a habit
- Every load: clean the lint screen.
- Every few months: wash the lint screen with warm soapy water if dryer sheets leave a film on it (test: water should pass through the mesh).
- Every year: clean the full vent duct. It is on our maintenance calendar.
When it is not a DIY job
Call a pro if the vent runs through a long, concealed path (attic, crawlspace, or long vertical runs on upper floors), if there is a blockage you cannot clear, or if the dryer still overheats, takes too long to dry, or shuts off after the vent is clean. Those symptoms can point to a failed thermal fuse, thermostat, heating element, or gas valve component.
Step-by-step summary
- Disconnect power and gas. Unplug the dryer. For a gas dryer, also close the gas shutoff valve and move the dryer carefully so the gas line is not strained.
- Pull the dryer out and disconnect the duct. Slide the dryer away from the wall and loosen the clamp holding the transition duct to the dryer outlet.
- Clean the lint screen housing. Remove the lint screen and vacuum the slot it sits in, using a narrow attachment or lint brush.
- Brush the vent duct. Feed a rotary vent brush into the wall duct, spinning it clockwise with a drill on low speed, adding rods as you go until you reach the exterior hood. Pull out the loosened lint and vacuum it up.
- Clean the exterior vent hood. Outside, remove lint and any nests from the vent hood and make sure the flap opens and closes freely.
- Reconnect and test. Reconnect the transition duct without crushing it, push the dryer back, restore power and gas, and run the dryer on air-only to confirm strong airflow at the exterior hood.
Tools and supplies mentioned
Gardus LintEater RLE202 Rotary Dryer Vent Cleaning Kit
by Gardus
Four 3-foot screw-together flexible rods (12 feet total from one end) with a self-feeding auger brush, a lint trap brush, and vacuum and dryer adapters. Requires a cordless drill.
Fit check: Sized for standard 4-inch dryer ducts. Longer runs need the separate extension kit or cleaning from both ends.
Frequently asked questions
How often should a dryer vent be cleaned?
NFPA advises cleaning lint out of the vent pipe once a year, or more often if clothes take longer than normal to dry. Clean the lint screen before or after every load.
What are signs of a clogged dryer vent?
Clothes taking more than one cycle to dry, the dryer or laundry room getting unusually hot, a burning smell, lint around the exterior vent, or a vent flap that barely opens when the dryer runs.
Is plastic or foil dryer duct safe?
NFPA recommends rigid or flexible metal venting to maintain proper airflow. Replace white vinyl or thin foil accordion duct, which sags, traps lint, and can be crushed behind the dryer.
Can a clogged vent damage the dryer?
Yes. Restricted airflow makes the dryer run hotter and longer, which can trip the thermal fuse or high-limit thermostat and stress the heating element or gas burner components.